13 Must-Know Video SEO Statistics for 2023
![Raj Vardhman]()

Raj Vardhman
Updated · May 24, 2023
Deyan has been fascinated by technology his whole life. From the first Tetris game all the way to Fa... | See full bio
This page may contain links to our partners’ products and services, which allows us to keep our website sustainable. Тechjury.net may receive a compensation when you sign up and / or purchase a product or a service using our links. As an Amazon Associate we earn commissions from qualified purchases. This comes at no extra cost to you. On the contrary, these partnerships often allow us to give you discounts and lower prices. However, all opinions expressed on our site are solely ours, and this content is in no way provided or influenced by any of our partners.
We’ve all had to deal with internet connection issues at one point or another, from specific websites not loading to general unexplainable slowdowns.
In those situations, you’ll definitely want to think about how to flush the DNS on your Mac, as this might be the way to fix the problem you’re encountering. So, if you want to learn more, read on!
The DNS basically serves as a communicator between you and the website you're trying to access, and if you've recently visited the website, the information is cached for a faster response the next time you try to access it.
However, if the DNS cache is outdated or corrupted, it could cause connectivity issues, which is one of the reasons why you might need to flush it.
| Check out our thorough guide to learn more about DNS and why it matters. |
Here are the steps on how to flush the DNS cache on Mac:

Source: MacKeeper
If you have an older version of macOS, the command will differ from the one mentioned above, while the process to clear the DNS cache on Mac remains the same.
Almost every version of Mac has a different command. If you don’t know which version of macOS you have, click on the Apple icon located in the top left corner of your screen, and select About This Mac.
Now that you know which version of the OS you have, find the appropriate command in the table below and copy it to the Terminal application to clear the DNS cache.
| macOS Version | Command |
| Mac OS X 10.4 (Tiger) | lookupd -flushcache |
| Mac OS X 10.5 (Leopard) | sudo lookupd -flushcache |
| Mac OS X 10.6 (Snow Leopard) | sudo dscacheutil -flushcache |
| Mac OS X 10.7 (Lion) | sudo killall -HUP mDNSResponder |
| OS X 10.8 (Mountain Lion) | sudo killall -HUP mDNSResponder |
| OS X 10.9 (Mavericks) | sudo killall -HUP mDNSResponder |
| OS X 10.10 (Yosemite) | sudo discoveryutil udnsflushcaches |
| OS X 10.11 (El Capitan) | sudo killall -HUP mDNSResponder |
| macOS 10.12 (Sierra) | sudo killall -HUP mDNSResponder |
| macOS 10.13 (High Sierra) | sudo killall -HUP mDNSResponder |
| macOS 10.14 (Mojave) | sudo killall -HUP mDNSResponder |
| macOS 10.15 (Catalina) | sudo dscacheutil -flushcache; sudo killall -HUP mDNSResponder |
| macOS 11 (Big Sur) | sudo dscacheutil -flushcache; sudo killall -HUP mDNSResponder |
| macOS 12 (Monterey) | sudo dscacheutil -flushcache; sudo killall -HUP mDNSResponder |
If you don’t want to flush the DNS on your Mac manually, we recommend a cache-clearing tool like MacKeeper. This tool will clear your DNS cache automatically in a flash. You won’t have to worry about MacKeeper deleting important files, as it will only remove the unnecessary ones.
To flush the DNS cache on Mac with third-party software like MacKeeper, follow these steps:
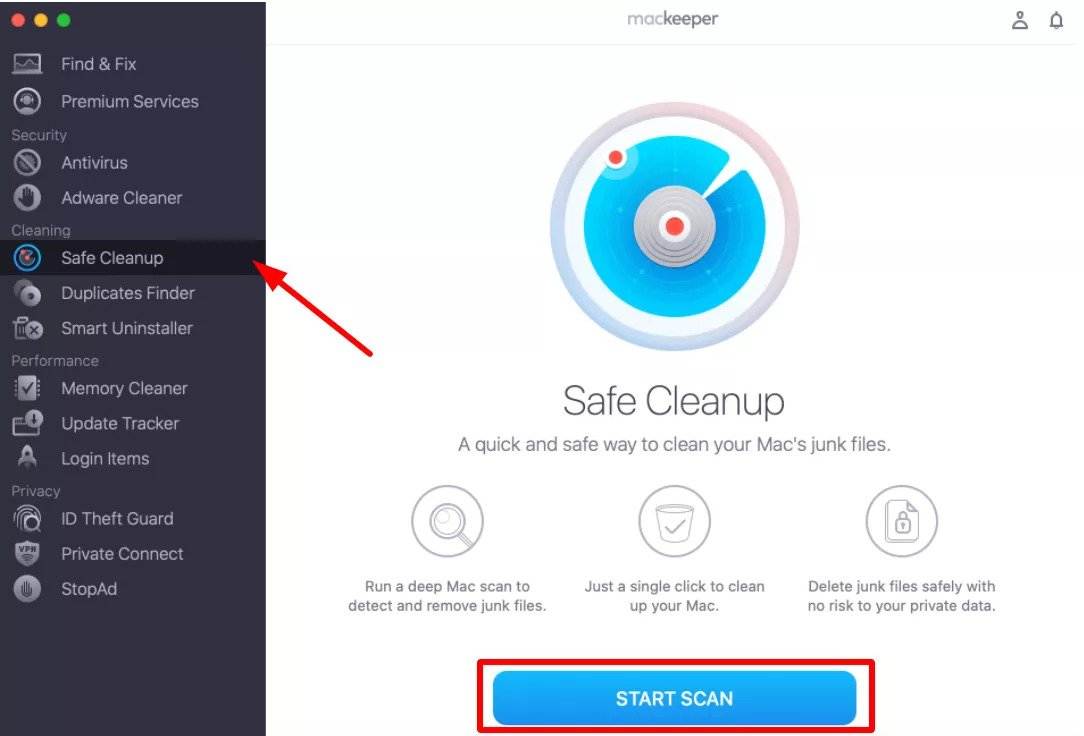
Source: MacKeeper
Clearing the DNS cache on your Mac is a good idea whenever you’re facing connectivity issues of any kind, from general slowdowns to particular websites not loading properly.
By following the steps we’ve gone over in this guide or utilizing the MacKeeper tool, you’ll hopefully be able to fix whatever issues you’re facing.
Yes, doing a DNS flush on a Mac is usually a good idea, as it can fix connectivity issues and resolve security risks that you might be facing by using outdated files.
Clearing your DNS cache is perfectly safe, as it doesn’t get rid of any important data. Rather, it clears outdated temporary files that could be posing a security risk for your system.
The steps on how to flush the DNS on Mac are: open the Terminal application and type in the appropriate command for your macOS version. To renew it, click the Apple menu > System preferences > Network. Select the network service that needs renewal. Click on Advanced > TCP/IP > Renew DHCP Lease, and restart.

Deyan Georgiev
Deyan has been fascinated by technology his whole life. From the first Tetris game all the way to Falcon Heavy. Working for TechJury is like a dream come true, combining both his passions – writing and technology. In his free time (which is pretty scarce, thanks to his three kids), Deyan enjoys traveling and exploring new places. Always with a few chargers and a couple of gadgets in the backpack. He makes mean dizzying Island Paradise cocktails too.
Latest from Author
Your email address will not be published.
Updated · May 24, 2023
Darko Jacimovic
Updated · May 24, 2023
Updated · May 24, 2023
Muninder Adavelli
Updated · May 24, 2023